
Here’s one of my favorite flatbreads from Middle Eastern and Mediterranean cuisine – Pita Bread. It’s a soft, leavened bread made with all-purpose flour, yeast, salt, water and sometimes with a hint of olive oil or sugar. What I love about it is how easy and versatile it is – you can cook it on a skillet or bake it in the oven. This vegan Pita Bread Recipe yields perfectly puffed, soft flatbreads that pair beautifully with Middle Eastern dips or even Indian curries and lentils.
About Pita Bread Recipe
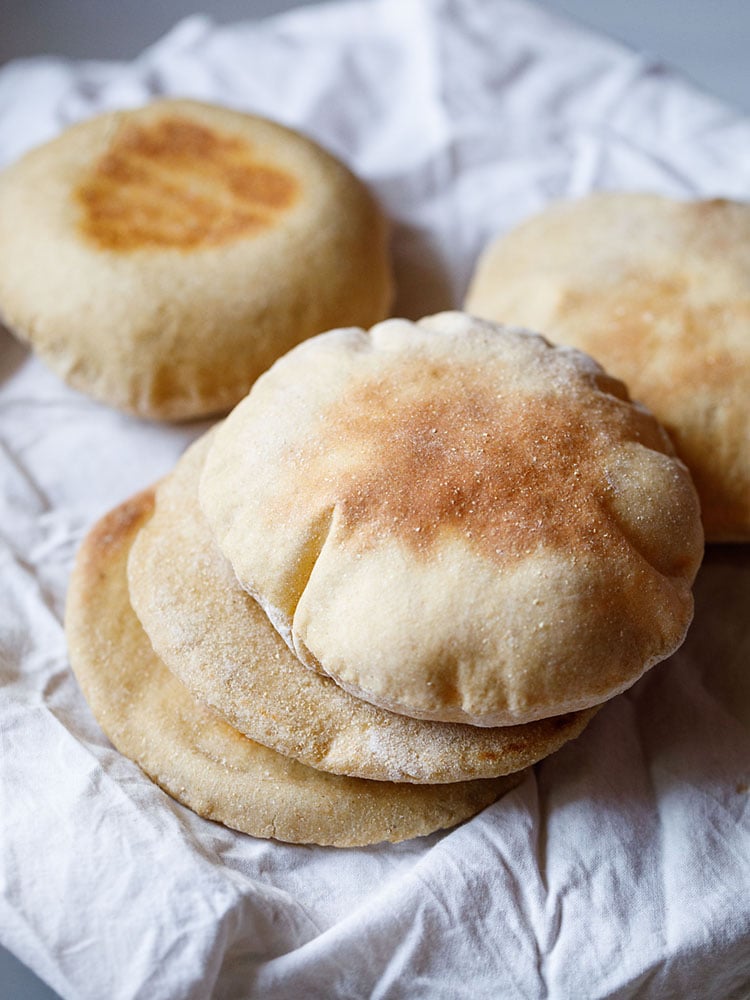
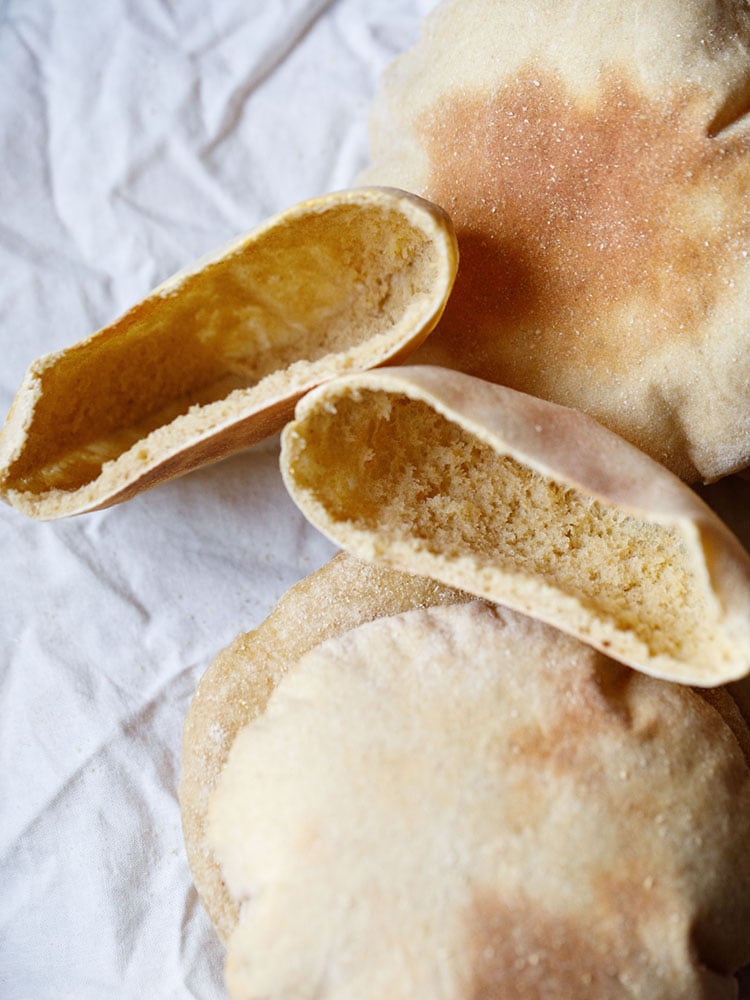
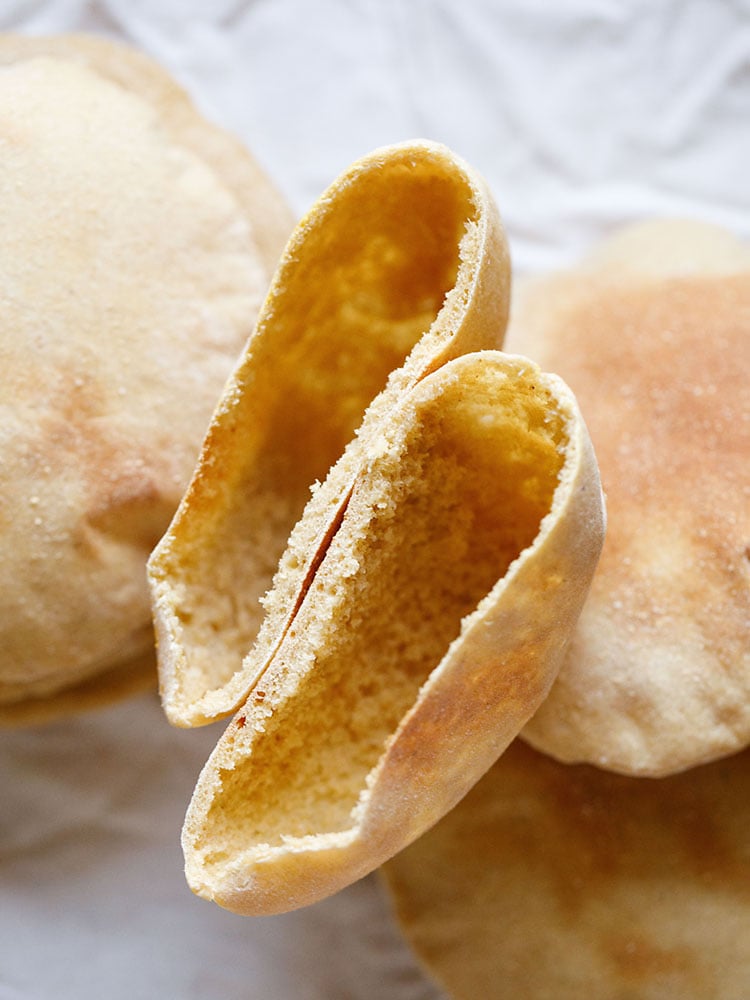
Pita Bread is a popular Middle Eastern/Mediterranean leavened flatbread made with simple basic ingredients – flour, salt, water and yeast. It puffs up when baked creating an air pocket in the middle.
As it cools, it deflates and flattens, but the pocket remains. Then, when you cut it into halves, each half has its own pocket. This flatbread looks simple, but is unique in its formation.
A classic and traditional pita bread is made with all-purpose flour. However, I make mine with whole wheat flour.
Even though this Pita Bread recipe is made with whole wheat flour (atta), it yields a lovely soft and light texture. It also has the trademark pita pocket perfect for stuffing with tahini, Hummus, Falafel, Muhammara or anything else you’d like!
Pita Bread is one of the easiest breads to make. It is versatile and the uses are so much more than a pocket to put yummy things in. You can toast it to make pita chips or even use it flat to make a quick and easy pita pizza.
All you require for this Pita Bread Recipe is a handful of ingredients like whole wheat flour, extra virgin olive oil, salt, sugar, yeast (instant or dry active) and water.
Then, follow the recipe to make the dough, keep it to leaven, shape the breads out of it and cook in the oven or stovetop.
I used my stovetop to make the Pita Bread for the first time at home decades back. It was thrilling to watch the bread puffing up.
Then later, I started making these flatbreads in the oven and found that this caused it to puff up even further.
As compared to making the bread on a pan or skillet, baking in the oven is better. It prevents the bread from browning too much. However, I like a slight more browning because I prefer my bread well baked.
This Pita Bread Recipe is adapted from one of my favorite bread cookbooks “The Bread Bible: 300 Favorite Recipes” by Beth Hensperger. I can tell you from a lot of experience that this is a really good recipe for making Pita Bread.
Step-by-Step Guide
How to make Pita Bread
Make Dough
1. Firstly, take 1 teaspoon instant yeast and 1 pinch sugar in a stand mixer bowl or in any bowl in which you will knead the dough.

2. Pour 1 to 1.25 cups water and mix very well with a spoon. Depending on the quality of flour, you may add 1 to 1.25 cups water.
Slightly coarse and grainy wheat flour will need 1.25 cups water.

3. Add 3 cups whole wheat flour, 2 tablespoons extra virgin olive oil and 1 teaspoon salt.
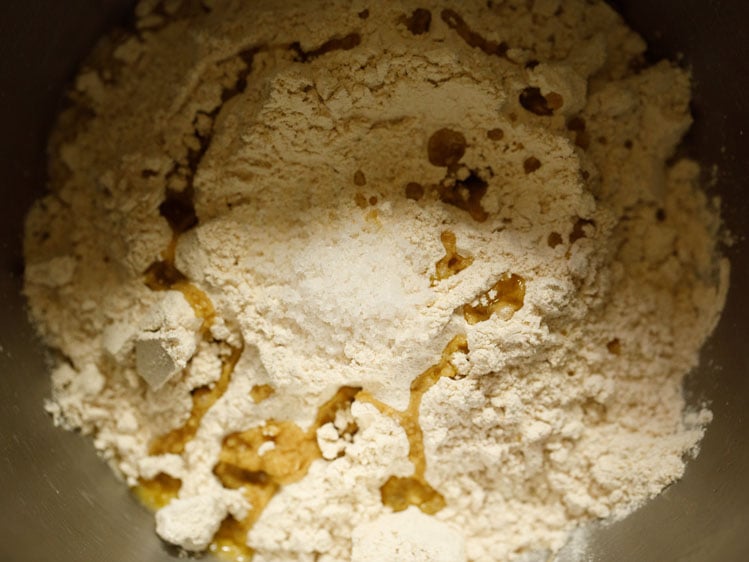
4. Mix everything with wooden spoon.
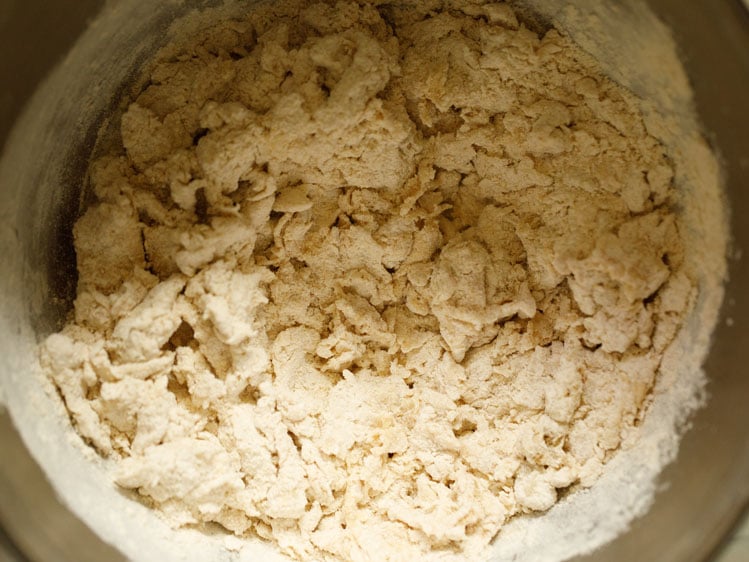
5. Then, using the hook attachment, begin to knead.
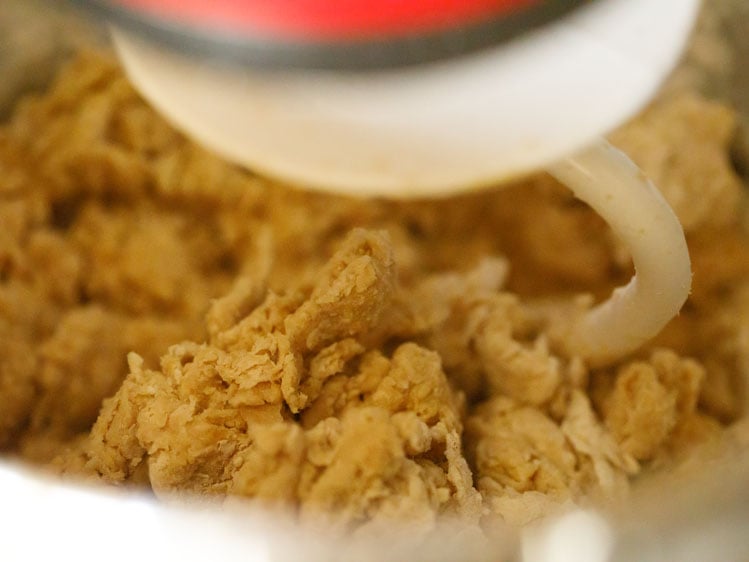
6. Initially, you will find the dough sticky. Continue to knead and you will see the flour absorbing the extra water.
The stickiness will also go away like this. If the dough looks very sticky even after kneading well, then add 3 to 4 tablespoons whole wheat flour.
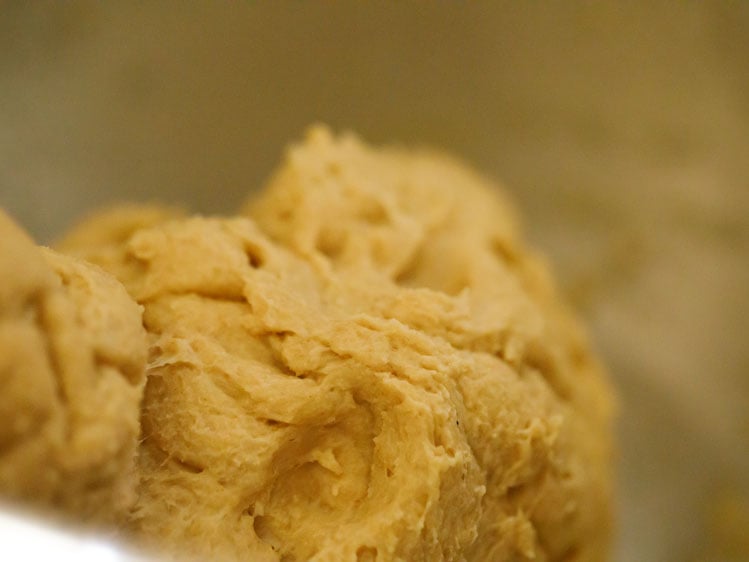
7. Knead to a smooth, supple and soft dough.
8. Rub or brush some water or olive oil all over the dough.

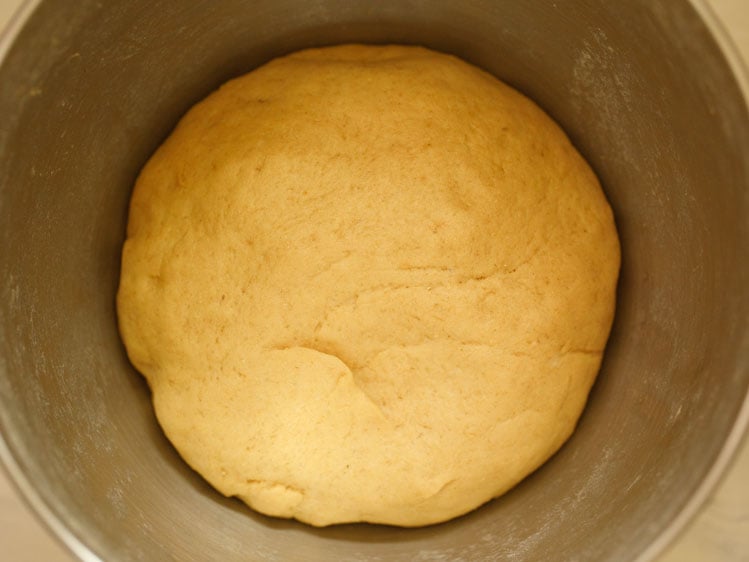
9. Keep it in the same bowl covered loosely with a kitchen towel for 45 minutes or 1 hour or until the dough has doubled in volume and size.
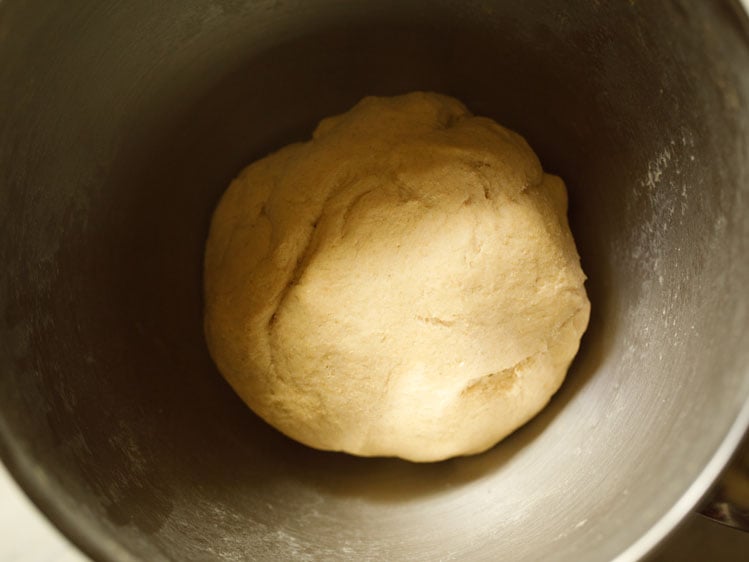
10. This is the photo of the dough after 1 hour.
11. Deflate the dough gently and knead lightly.
Assemble, Shape & Roll Dough
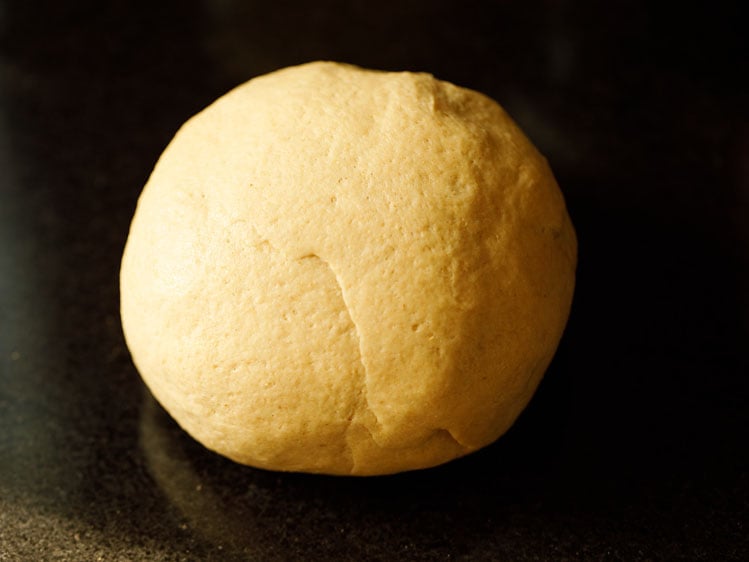
12. Make into a log shape and cut equal portions from the dough. Keep these covered again for 10 minutes. Keep the dough balls covered all the time so that they don’t dry out.

13. Meanwhile, place a baking tray in the oven. Then, preheat oven at 230 degrees C (446 degrees F) for 20 minutes.
14. Take each dough portion and shape into a ball. Keep it on the work surface and sprinkle some flour on it as well as on the dough ball.
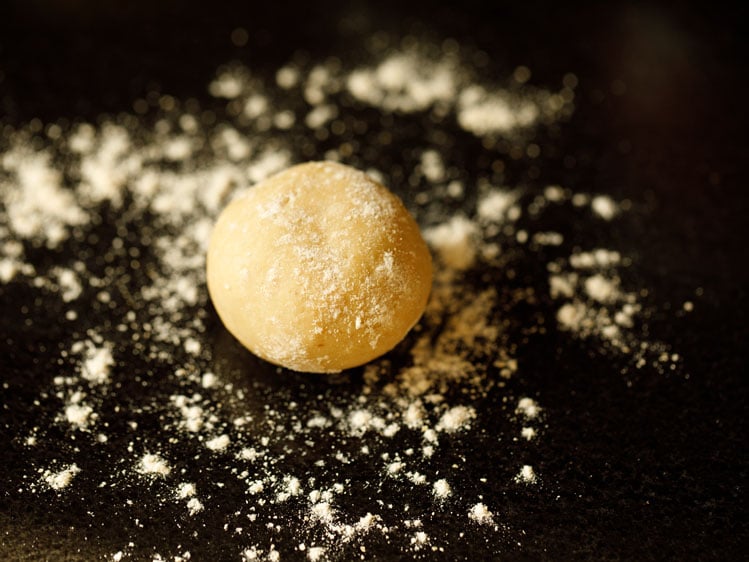
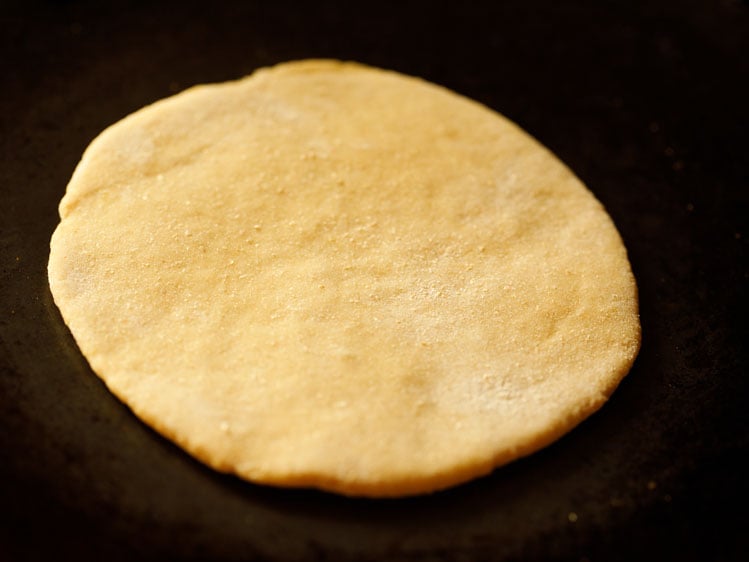
15. Roll evenly into a 5 or 6 inches round shape. You can also make them oval shaped, if you want. For puffing, it is very important to roll evenly.
So, dust with slightly more flour. When you roll the dough with the rolling pin, the bread disc should also move clockwise while rolling.
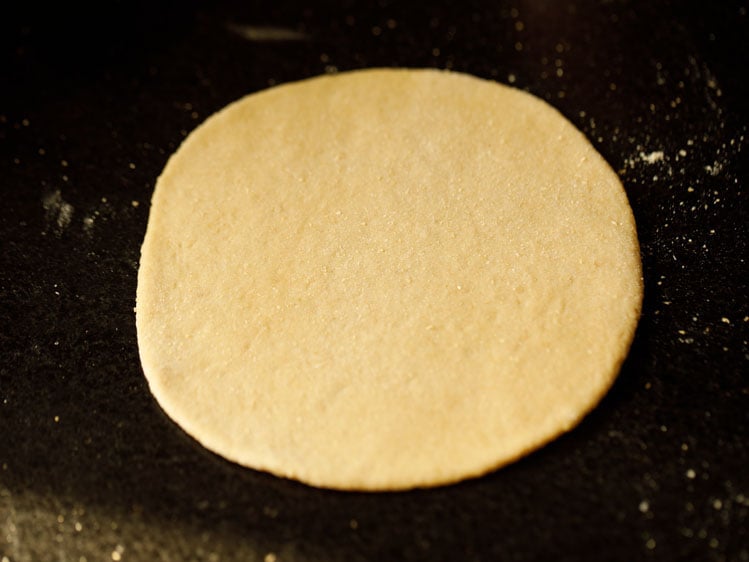
16. Keep the bread a little thick while rolling.
17. Keep these rolled discs covered loosely for 10 minutes.
Bake Pita Bread in oven
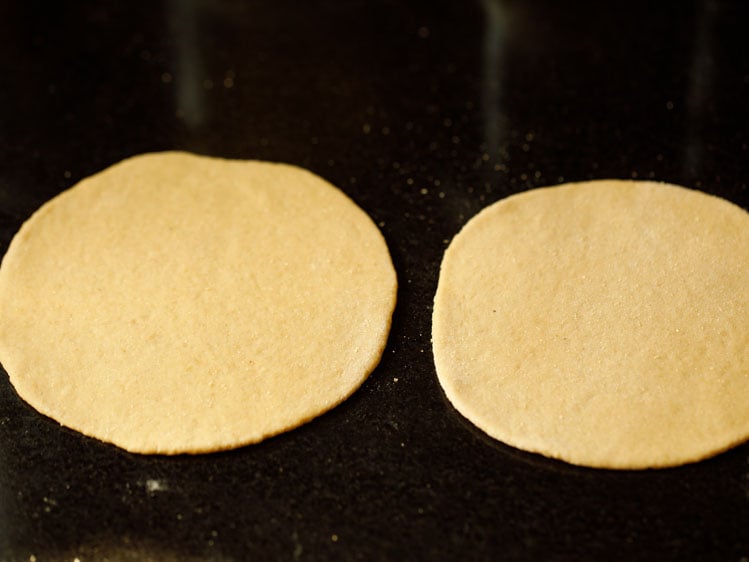
18. Carefully remove the baking tray from the oven with mittens. Sprinkle some flour and place the rolled discs in the tray.
Use oven mittens when removing and placing the baking tray from the oven.
19. Place the tray back in the oven. Bake at 230 degrees C for 7 to 10 minutes. Mine took 7 minutes to cook and 1 minute to brown. Heat both the top and bottom heating rods of the oven.
If using a convection oven, then preheat as well as bake at 200 or 210 degrees C (392 to 410 degrees F).
Note that the baking time will vary from oven to oven.

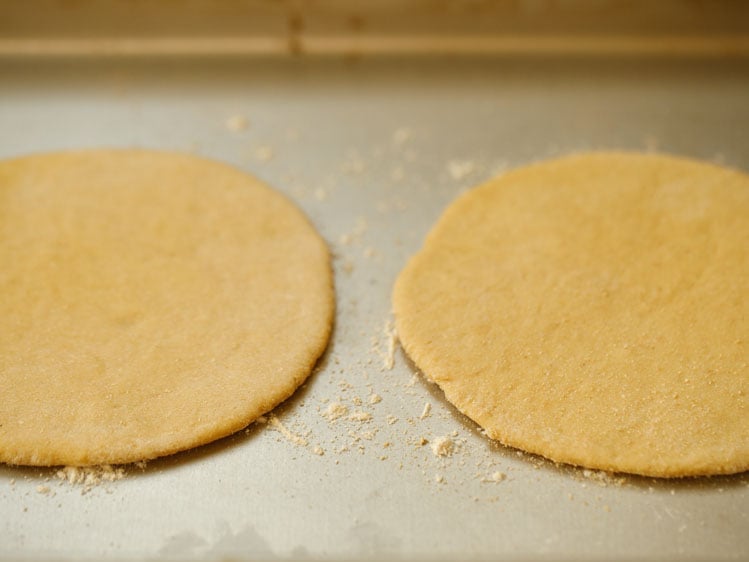
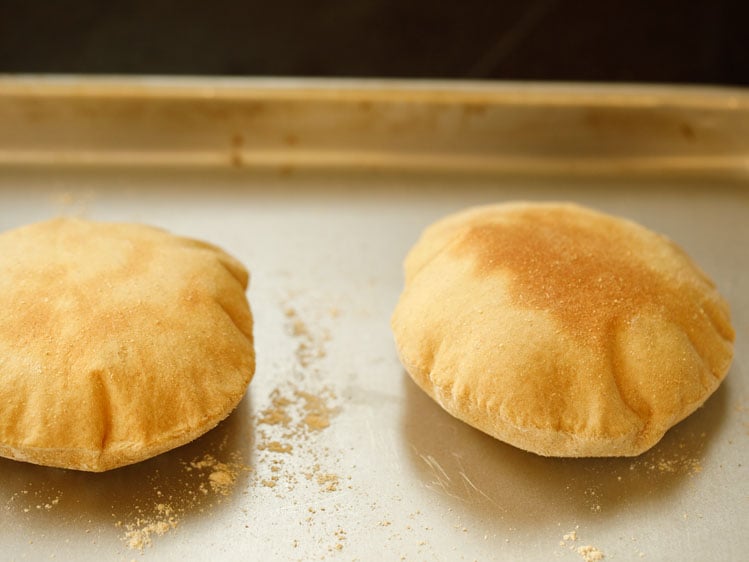
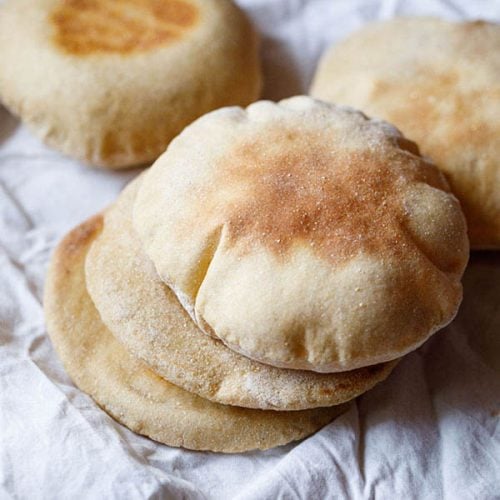
20. The Pita Bread will nicely puff up in the oven. Once they are puffed up and have a pale golden color, remove the tray.
With a spatula remove, them and place on a wired rack.
Cook on a skillet (Stovetop Method)
21. Heat a cast iron skillet or a frying pan on medium-high flame. Sprinkle some flour on the pan and it should get browned. This means that the pan is hot.
Before you place the rolled dough on the pan, brush off the browned flour or using a cotton kitchen napkin remove the browned flour from the pan.
Use a heavy pan so that the Pita Bread does not get burnt from the bottom. Place the rolled dough on the pan or skillet.
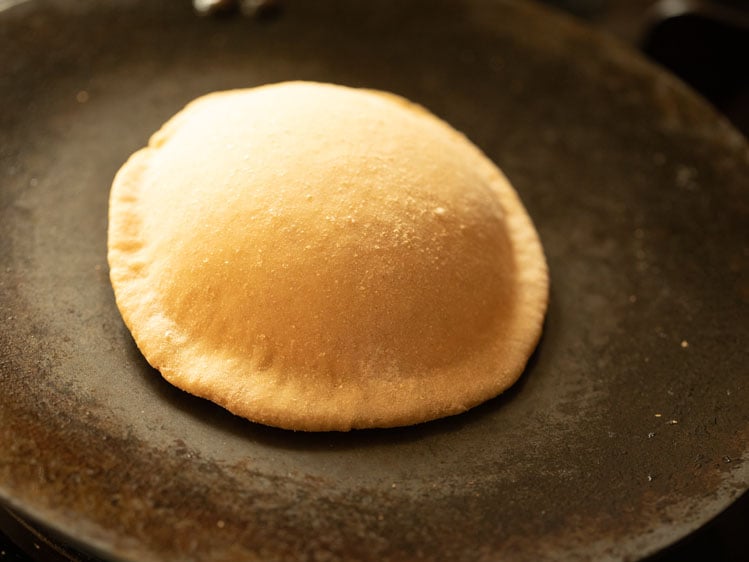
22. As soon as you keep the rolled dough on the pan you will see it getting puffed up.
23. Cover with lid for 1 to 2 minutes.
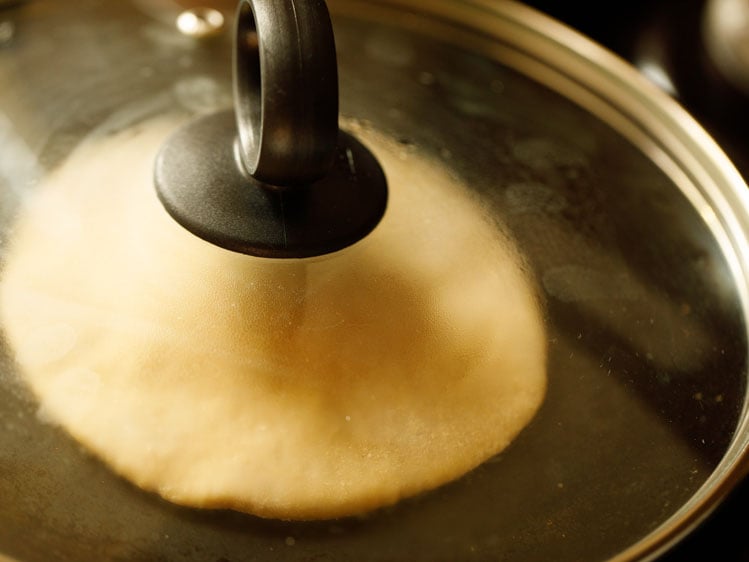
24. Here is the Pita Bread nicely puffed up.
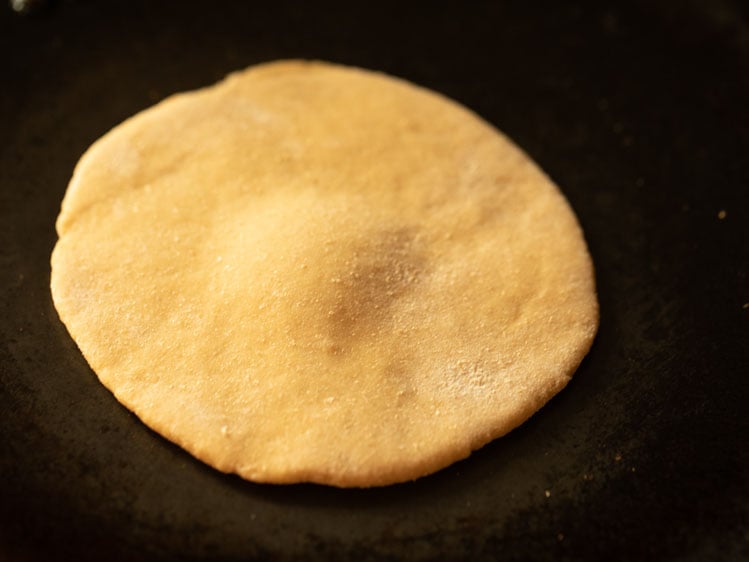
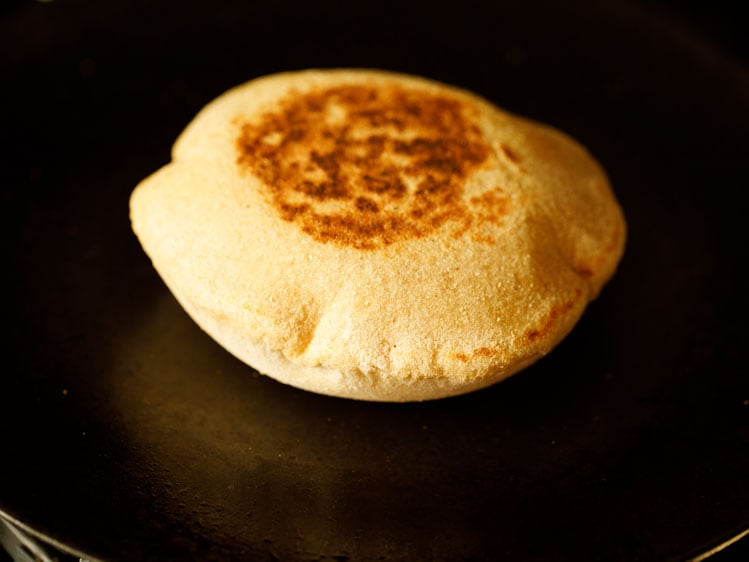
25. Turn over and cook for 1 to 2 minutes more or until the Pita Bread is cooked well and has brown spots appearing on both sides. Roast all the breads this way.
26. Stack and store them in a kitchen towel or bread box. Slice the Pita Bread into 2 and you will see the pockets.
Stuff the pockets with a filling of your choice and your Pita sandwich is ready. You can make Pita sandwiches with falafel, hummus, tahini and pickles or salad.

Serving Suggestions
Once you have made your homemade Pita Bread Recipe, you can get creative and come up with different sandwich combinations and fillings.
Falafel is a traditional filling. However, you can really stuff it with anything you like. Any type of mixed salad and dressing works well as the bread allows the taste of the salad to come through while also turning it into a filling meal.
For a more authentic Indian or Middle Eastern experience, fill your Pita Bread with some spiced sautéed vegetables or mushrooms, potatoes or Chole Masala.
Add some onion rings, tomato slices, mint chutney and tamarind chutney. Or make some Vegetable Kababs or pan-fried Vegetable Cutlet and add some classic Indian chutneys.
If you enjoy clean and fresh flavors, this Mediterranean-style Chickpea Salad makes a delicious and wholesome filling for your pita pockets.
For a flavorful fusion twist, try a Paneer Shawarma wrap—tucked inside warm pita and topped with crunchy vegetable salad and tangy pickles.
You can also toast the pita to make crispy Pita Wedges; with or without cheese, and season them with your favorite blend of spices and herbs. So many options!
Reheating: When reheating or warming the Pita Bread, place the bread of a hot pan or skillet. Keep it for 10 to 12 seconds on medium heat or until lightly hot on both sides.
Expert Tips
- Using dry active yeast: Make sure to activate and proof the dry active yeast, if using. If not done so, then your dough will not leaven properly. This will result in a hard bread. Ensure that the water used for the yeast is lukewarm. Not hot or cool.
- Dough: The dough has to be kneaded with the apt quantity of water. Less water results in a hard or dense dough. With this, your pita won’t puff up. Add more or less water based on the quality and type of the whole wheat flour used. You should have a well kneaded, smooth, supple and soft dough.
- Kneading with hands: You can easily the knead the dough with your hands. This has to be done for about 10 to 12 minutes. If, after kneading well, the dough looks sticky, then add some more flour, mix and knead till desired consistency is achieved.
- Rolling: Your Pita won’t puff well, if you haven’t rolled the dough evenly. The quintessential pockets will also be missing in this case and there’ll be puffing at some areas and flatness on others on the bread.
- Heating the oven: Make sure that your oven is very hot. If your oven is not well preheated or hot enough, then it will result in flat breads.
- Storing: You can store the breads in a zip lock bag or steel box. Then, put in a refrigerator or freeze.
- Substitutes: Use all-purpose flour (maida) in place of whole wheat flour (atta); use dairy or vegan milk in place of water; use dry active yeast in place of fresh yeast.
- Scaling: This Pita Bread Recipe can easily be halved or doubled as per your requirements.
FAQs
There are a few things that, if done correctly, will puff the bread resulting in pockets.
– Water: The dough needs to have the perfect amount of water in it. Less percentage of water will make the dough hard. Bread won’t puff up.
– Texture: The dough has to be kneaded really well to a soft and smooth texture.
– Rolling: If the dough is not rolled evenly, the bread won’t puff.
– Oven temperature: Sometimes, the oven isn’t actually reaching the temperature that it is set at. Then, it needs some calibration. If not thoroughly preheated or hot enough, the bread will be flat and not puff.
Yes. Add about 1 cup of water while kneading.
If you use dry active yeast, you need to activate it. If not done well, the dough won’t leaven, resulting in hard bread. While activating, use lukewarm water.
Yes, you can add same quantity of milk as that of water. Subject to change depending on the quality of flour.
Because the dough is not rolled evenly. Some parts will be thick and others thin. Makes the dough partially puff up at some spots.
Yes, you can. It will result in softer bread with a faint sourness.
Yes, you can.
Add 1 tablespoon fresh yeast. Make a note that you will need to activate and proof fresh yeast like dry active yeast.
You can but you will need to experiment with the recipe.
The dough has to be leavened outside, at room temperature. Once the dough is doubled, then you can refrigerate it.
Yes. Freeze them in zip lock bags or in boxes for 1 to 2 months.
More Bread Recipes To Try!
Please be sure to rate the recipe in the recipe card or leave a comment below if you have made it. For more vegetarian inspirations, Sign Up for my emails or follow me on Instagram, Youtube, Facebook, Pinterest or Twitter.
Pita Bread Recipe (Oven & Stovetop)
Pita Bread is a popular leavened flatbread from the Lebanese and Middle Eastern Cuisines. It is traditionally made with all-purpose flour, yeast, salt, water and sometimes with little olive oil and sugar. This healthier, homemade Pita Bread is soft, moist, light and has their trademark pockets. It is made with whole wheat flour and the usual staple ingredients – instant yeast, sugar, olive oil and water.
Prep Time 1 hour 30 minutes
Cook Time 30 minutes
Total Time 2 hours
Prevent your screen from going dark while making the recipe
Preparing dough
- Firstly take the instant yeast and sugar in a stand mixer bowl or in any bowl in which you will knead the dough. Pour 1 to 1.25 cups water and mix very well with a spoon.
Add 3 cups whole wheat flour, 2 tablespoons extra virgin olive oil and 1 teaspoon salt. Mix everything with wooden spoon.
- Then using the hook attachment of the stand mixer and begin to knead. Initially you will find the dough sticky, but continue to knead and you will see the extra water will be absorbed by the flour. Knead to a smooth, suppled and soft dough.
Rub or brush some water or olive oil all over the dough. Keep it in the same bowl covered loosely with a kitchen towel for 45 minutes or 1 hour until the dough has doubled in volume and size.
Assembling, shaping and rolling dough
Bake Pita Bread In Oven
- Carefully remove the tray with oven mittens. Sprinkle some flour and place the rolled discs on it. Use oven mittens when removing and placing the baking tray from the oven.
- Using oven mittens, place the tray back in the oven. Bake at 230 degrees C for 7 to 10 minutes. If using a convection oven, then preheat as well as bake at 200 or 210 degrees celsius. Note that the baking time will vary from oven to oven.
- The pita bread will nicely puff up in the oven. Once they are puffed up and have a pale golden color, remove the tray. With a spatula remove the pita bread and place on a wired rack.
Stovetop Method
Heat a cast iron skillet or a frying pan on medium-high flame.
- Sprinkle some flour on the pan and it should get browned. This means that the pan is hot. Use a heavy pan so that the pita bread does not burnt from the bottom. Before you place the rolled dough on the pan, brush off or remove the browned flour from the pan with the help of a cotton napkin.
Place the rolled pita bread disc on the pan or skillet.
Cover with lid for 1 to 2 minutes.
Turn over and cook for 1 to 2 minutes more till the pita bread is done and has brown spots appearing on both sides. Roast all pita breads this way.
- Stack pita bread and store them in a kitchen towel or bread box. Just slice the pita bread into two. You will see the pockets. Stuff the pockets with a filling of your choice and your pita sandwich is ready.
- Pita Bread Dough: The dough needs to have the perfect amount of water in it. Less percentage of water will make the dough hard or denser in texture and the pita bread won’t puff up. Depending on the quality and type of flour used, you can add less or more water. The dough has to be kneaded really well. It should be soft and smooth.
- Kneading with hands: The pita bread dough can be easily kneaded with hands. Knead the dough very well for about 10 to 12 minutes.
- Rolling the dough discs: If the dough is not rolled evenly, then the pita bread won’t puff. So there won’t be the pockets or you may have the pita bread puffing on some spots and remaining flat on others.
- Oven Heating: The oven has to be very hot. Sometimes the oven isn’t actually reaching the temperature that it is set at. Then you will need to calibrate the oven. If the oven isn’t thoroughly preheated or hot enough then this cause the pita bread to stay flat and not puff.
- Using dry active yeast: If you use dry active yeast then you need to activate it and proof it. If the activation and proofing is not done well, the dough won’t leaven resulting in hard bread. While activating, the water has to be lukewarm and not hot or cool. Note for instant yeast, you don’t need to proof or activate it and can use room temperature water
- Scaling: You can easily halve or double the recipe.
- Storing Pita Bread: Place them in a steel box or ziplock bags. Then you can either refrigerate or freeze the pita bread.
- Reheating: To warm or reheat pita bread, heat a skillet or pan. Place the pita bread and cook it for 10 to 12 seconds on medium-heat till lightly hot on both sides.
- Substitutes:
- Whole wheat flour: Replace with all purpose flour.
- Water: Can be replaced with milk (dairy or vegan).
- Instant yeast: You can use 2 teaspoons of dry active yeast and 1 tablespoon fresh yeast instead. Both these yeast will need to be activated in lukewarm water with sugar before adding to the flour.
Nutrition Facts
Pita Bread Recipe (Oven & Stovetop)
Amount Per Serving
Calories 151 Calories from Fat 36
% Daily Value*
Fat 4g6%
Saturated Fat 1g6%
Sodium 235mg10%
Potassium 142mg4%
Carbohydrates 27g9%
Fiber 4g17%
Sugar 1g1%
Protein 5g10%
Vitamin B1 (Thiamine) 1mg67%
Vitamin B2 (Riboflavin) 1mg59%
Vitamin B3 (Niacin) 2mg10%
Vitamin B6 1mg50%
Vitamin E 1mg7%
Vitamin K 2µg2%
Calcium 12mg1%
Vitamin B9 (Folate) 44µg11%
Iron 1mg6%
Magnesium 50mg13%
Phosphorus 136mg14%
Zinc 1mg7%
* Percent Daily Values are based on a 2000 calorie diet.
Pita Bread recipe from the archives was first published on July 2012.

Source link